


Netty是一个高性能的Java网络编程框架,专注于快速开发可靠的高并发网络应用。它基于Java NIO技术,支持异步和事件驱动机制,能处理大量并发连接,适用于高负载环境。Netty提供简洁的API,支持多种网络协议如TCP、UDP、HTTP、WebSocket等,并允许自定义协议处理。其核心组件包括Channel、EventLoop等,使得网络编程更加灵活和高效。Netty广泛应用于互联网服务、大型游戏、数据库和云平台,特别适合构建高性能和高可靠性的网络应用。
本文分别从线程模型、io模型、相关参数、零拷贝、粘包半包几个方面,来讲清netty的基本原理和常见知识点
一、线程模型
客户端连接数的限制
- 内存资源
- CPU资源
- 端口号资源
cat /proc/sys/net/ipv4/ip_local_port_range
- 文件描述符资源
系统级:当前系统可打开的最大数量,通过 cat /proc/sys/fs/file-max 查看
用户级:指定用户可打开的最大数量,通过 cat /etc/security/limits.conf 查看
进程级:单个进程可打开的最大数量,通过 cat /proc/sys/fs/nr_open 查看
- 线程资源
BIO/NIO
1. BIO模型
- 所有操作都是同步阻塞(accept,read)
- 客户端连接数与服务器线程数比例是1:1
2. NIO模型
- 非阻塞IO
- 通过selector实现可以一个线程管理多个连接
- 通过selector的事件注册(OP_READ/OP_WRITE/OP_CONNECT/OP_ACCEPT),处理自己感兴趣的事件
- 客户端连接数与服务器线程数比例是n:1
3. Reacor模型
Reactor模型通常是指一种并发编程模型,用于处理事件驱动的程序。它常用于构建高性能的服务器和网络应用程序。在Reactor模型中,有一个事件循环(Event Loop)负责监听和分发事件,这些事件可以是网络连接、数据到达、定时器触发等等。当事件发生时,相关的处理函数(Handler)会被调用来处理事件,以响应请求或执行逻辑。
Reactor模型通常包括以下组件:
- 事件源(Event Source):负责产生事件,如套接字或文件描述符。
- 事件循环(Event Loop):负责监听事件源,将事件分发给相应的处理函数。
- 处理函数(Handler):执行实际的处理逻辑,如处理请求、读写数据等。
Reactor模型有助于实现高并发和高性能的应用程序,因为它能够有效地管理多个并发事件,而无需创建线程或进程来处理每个事件。它在许多网络服务器框架中得到广泛应用,如Node.js、Twisted(Python框架)等。
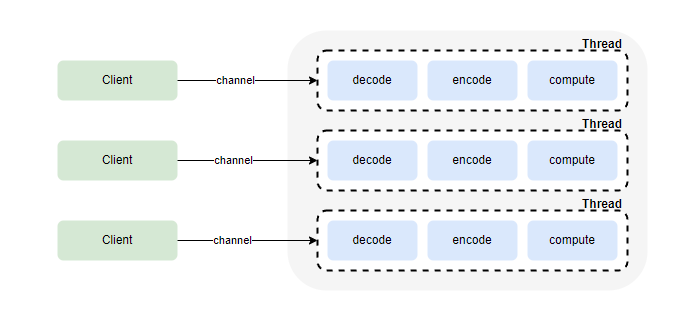
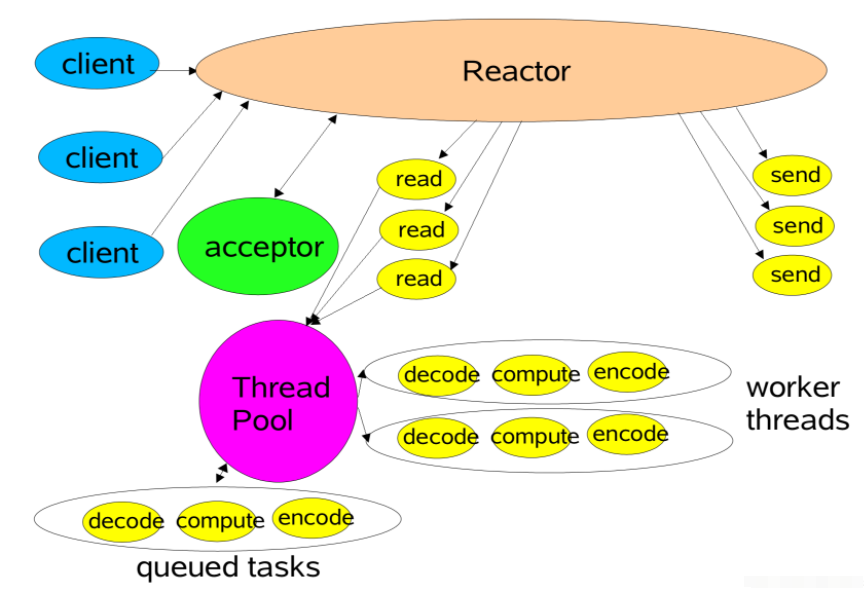
①. 单Reacor单线程模型
所有IO在同一个NIO线程完成(处理连接,分派请求,编码,解码,逻辑运算,发送)
- 优点:
- 编码简单
- 不存在共享资源竞争
- 并发安全
- 缺点:
- 单线程处理大量链路时,性能无法支撑,不能合理利用多核处理
- 线程过载后,处理速度变慢,会导致消息积压
- 一旦线程挂掉,整个通信层不可用
redis使用的就是reactor单进程模型,redis由于都是内存级操作,所以使用此模式没什么问题
- reactor单线程模型图:
- netty reactor单线程模型图:
// Netty对应实现方式:创建io线程组时,boss和worker,使用同一个线程组,并且线程数为1
EventLoopGroup ioGroup = new NioEventLoopGroup(1);
b.group(ioGroup, ioGroup)
        .channel(NioServerSocketChannel.class)
        .childHandler(initializer);
ChannelFuture f = b.bind(portNumner);
cf = f.sync();
f.get();
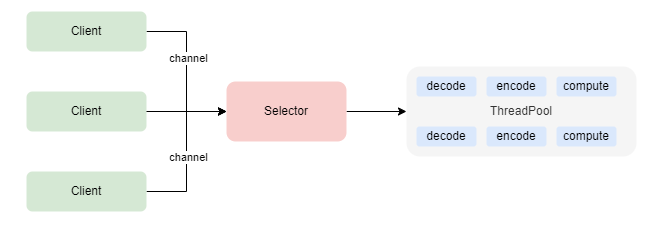
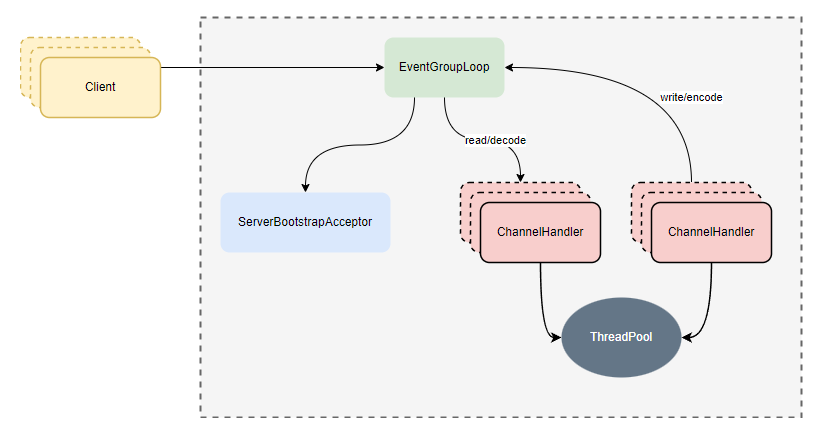
②. 单Reactor多线程模型
根据单线程模型,io处理中最耗时的编码,解码,逻辑运算等cpu消耗较多的部分,可提取出来使用多线程实现,并充分利用多核cpu的优势
- 优点:
- 多线程处理逻辑运算,提高多核CPU利用率
- 缺点:
- 对于单Reactor来说,大量链接的IO事件处理依然是性能瓶颈
- reactor多线程模型图:
- netty reactor多线程模型图:
// Netty对应实现方式:创建io线程组时,boss和worker,使用同一个线程组,并且线程数为1,把逻辑运算部分投递到用户自定义线程处理
EventLoopGroup ioGroup = new NioEventLoopGroup(1);
b.group(ioGroup, ioGroup)
        .channel(NioServerSocketChannel.class)
        .childHandler(initializer);
ChannelFuture f = b.bind(portNumner);
cf = f.sync();
f.get();
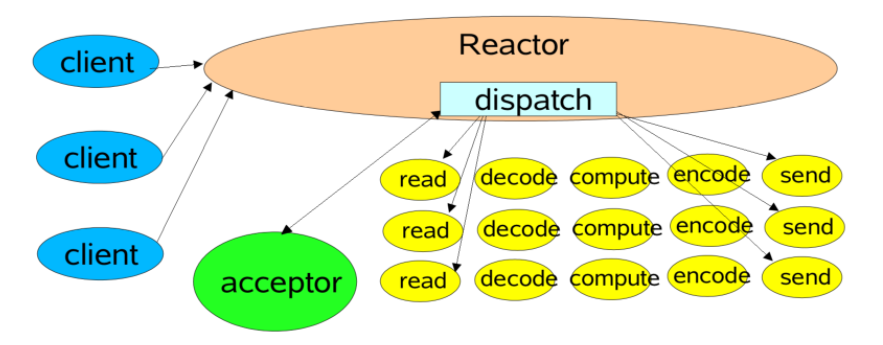
③. 主从Reactor多线程模型
根据多线程模型,可把它的性能瓶颈做进一步优化,即把reactor由单个改为reactor线程池,把原来的reactor分为mainReactor和subReactor
- 优点:
- 解决单Reactor的性能瓶颈问题(Netty/Nginx采用这种设计)
- reactor主从多线程模型图:
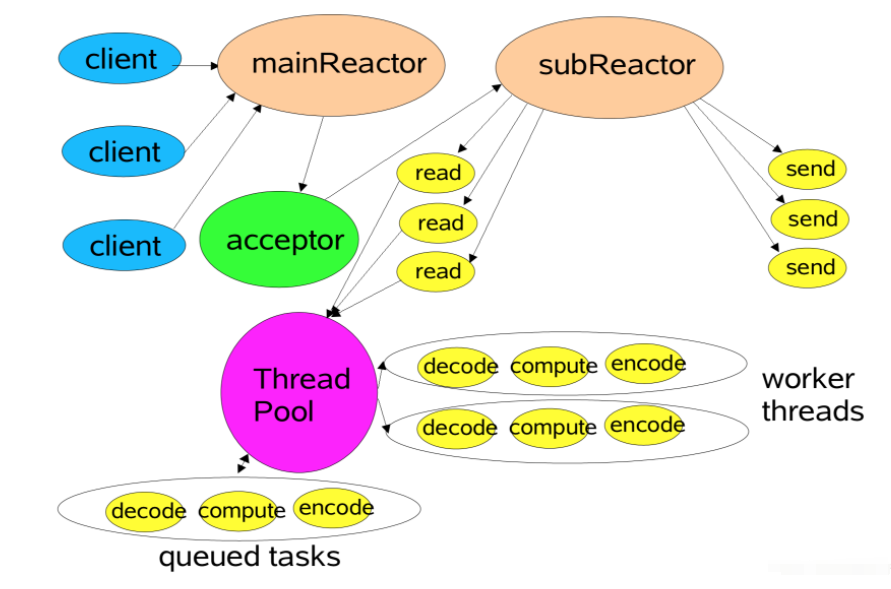
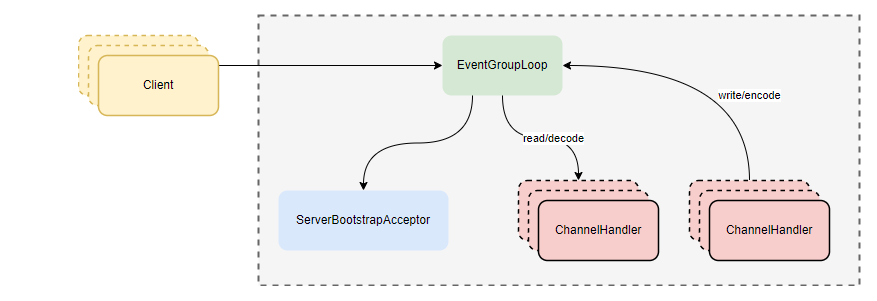
- netty reactor主从多线程模型图:
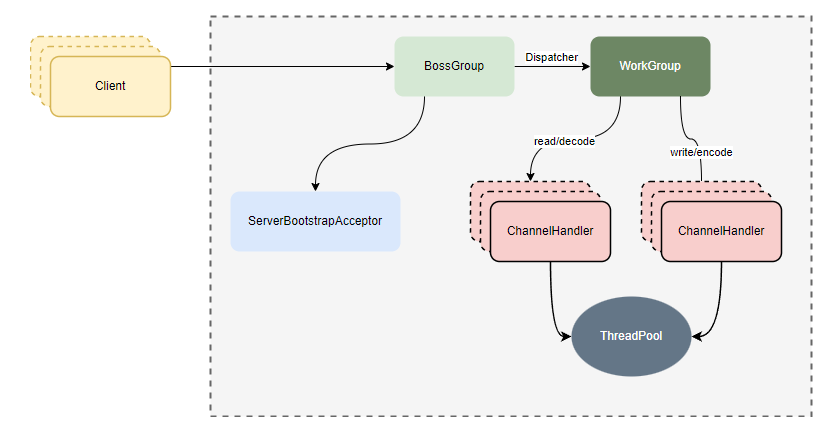
// Netty对应实现方式:创建io线程组boss和worker,boss线程数为1,work线程数为cpu*2(一般IO密集可设置为2倍cpu核数)
EventLoopGroup bossGroup = new NioEventLoopGroup(1);
EventLoopGroup workerGroup = new NioEventLoopGroup();
b.group(bossGroup, workerGroup)
        .channel(NioServerSocketChannel.class)
        .childHandler(initializer);
ChannelFuture f = b.bind(portNumner);
cf = f.sync();
f.get();
④. 部分源码分析
- 创建group实例
// 1.构造参数不传或传0,默认取系统参数配置,没有参数配置,取CPU核数*2
super(nThreads == 0 ? DEFAULT_EVENT_LOOP_THREADS : nThreads, executor, args);
private static final int DEFAULT_EVENT_LOOP_THREADS;
static {
    DEFAULT_EVENT_LOOP_THREADS = Math.max(1, SystemPropertyUtil.getInt(
            "io.netty.eventLoopThreads", NettyRuntime.availableProcessors() * 2));
}
// 2.不同版本的JDK会有不同版本的SelectorProvider实现,Windows下的是WindowsSelectorProvider
public NioEventLoopGroup(int nThreads, Executor executor) {
    //默认selector,最终实现类似:https://github.com/frohoff/jdk8u-jdk/blob/master/src/macosx/classes/sun/nio/ch/DefaultSelectorProvider.java
    //basic flow: 1 java.nio.channels.spi.SelectorProvider 2 META-INF/services 3 default
    this(nThreads, executor, SelectorProvider.provider());
}
// 3.创建nThread个EventExecutor,并封装到选择器chooser,chooser会根据线程数分别有两种实现(GenericEventExecutorChooser和PowerOfTwoEventExecutorChooser,算法不同,但实现逻辑一样,就是均匀的分配线程处理)
EventExecutorChooserFactory.EventExecutorChooser chooser;
children = new EventExecutor[nThreads];
for (int i = 0; i < nThreads; i ++) {
    // ...
    children[i] = newChild(executor, args);
    // ...
}
chooser = chooserFactory.newChooser(children);
- 设置group
// 两种方式设置group
// parent和child使用同一个group,调用仍然是分别设置parent和child
@Override
public ServerBootstrap group(EventLoopGroup group) {
    return group(group, group);
}
ServerBootstrap.group(EventLoopGroup parentGroup, EventLoopGroup childGroup){
    // 具体代码略,可直接参考源码
    // 里面实现内容是把parentGroup绑定到this.group,把childGroup绑定到this.childGroup
}
- Netty启动
// 调用顺序
ServerBootstrap:bind() -> doBind() -> initAndRegister()
private ChannelFuture doBind(final SocketAddress localAddress) {
    final ChannelFuture regFuture = initAndRegister();
    // ...
    doBind0(regFuture, channel, localAddress, promise);
    // ...
}
final ChannelFuture initAndRegister() {
    // 创建ServerSocketChannel
    Channel channel = channelFactory.newChannel();
    // ...
    // 开始register
    ChannelFuture regFuture = config().group().register(channel);
    // register调用顺序
    // next().register(channel) -> (EventLoop) super.next() -> chooser.next()
    // ...
}
由以上源码可得知,bind只在起服调用一次,因此bossGroup仅调用一次regist,也就是仅调用一次next,因此只有一根线程是有用的,其余线程都是废弃的,所以bossGroup线程数设置为1即可
// 启动BossGroup线程并绑定本地SocketAddress
private static void doBind0(
        final ChannelFuture regFuture, final Channel channel,
        final SocketAddress localAddress, final ChannelPromise promise) {
    channel.eventLoop().execute(new Runnable() {
        @Override
        public void run() {
            if (regFuture.isSuccess()) {
                channel.bind(localAddress, promise).addListener(ChannelFutureListener.CLOSE_ON_FAILURE);
            } else {
                promise.setFailure(regFuture.cause());
            }
        }
    });
}
- 客户端连接
// 消息事件读取
NioEventLoop.run() -> processSelectedKeys() -> ... -> ServerBootstrapAcceptor.channelRead
// ServerBootstrapAcceptor.channelRead处理客户端连接事件
// 最后一行的childGroup.register的逻辑和上面的代码调用处一样
public void channelRead(ChannelHandlerContext ctx, Object msg) {
    child.pipeline().addLast(childHandler);
    setChannelOptions(child, childOptions, logger);
    setAttributes(child, childAttrs);
    childGroup.register(child)
}
二、select/poll和epoll
1.概念
- select(时间复杂度O(n)):用一个fd数组保存所有的socket,然后通过死循环遍历调用操作系统的select方法找到就绪的fd
while(1) {
  nready = select(list);
  // 用户层依然要遍历,只不过少了很多无效的系统调用
  for(fd <-- fdlist) {
    if(fd != -1) {
      // 只读已就绪的文件描述符
      read(fd, buf);
      // 总共只有 nready 个已就绪描述符,不用过多遍历
      if(--nready == 0) break;
    }
  }
}
- poll(时间复杂度O(n)):同select,不过把fd数组换成了fd链表,去掉了fd最大连接数(2048个)的数量限制
- epoll(时间复杂度O(1)):解决了select/poll的几个缺陷
- 调用需传入整个fd数组或fd链表,需要拷贝数据到内核
- 内核层需要遍历检查文件描述符的就绪状态
- 内核仅返回可读文件描述符个数,用户仍需自己遍历所有fd
- epoll是操作系统基于事件关联fd,做了以下优化:
- 内核中保存一份文件描述符集合,无需用户每次都重新传入,只需告诉内核修改的部分即可。(epoll_ctl)
- 内核不再通过轮询的方式找到就绪的文件描述符,而是通过异步 IO 事件唤醒。(epoll_wait)
- 内核仅会将有 IO 事件的文件描述符返回给用户,用户也无需遍历整个文件描述符集合。
epoll仅在Linux系统上支持
2.jdk提供selector
// DefaultSelectorProvider.create方法在不同版本的jdk下有不同实现,创建不同Selector
// Windows版本的jdk,其实现中调用的是native的poll方法
public static SelectorProvider create() {
    return new WindowsSelectorProvider();
}
// Linux版本的jdk
public static SelectorProvider create() {
    String str = (String)AccessController.doPrivileged(new GetPropertyAction("os.name"));
    if (str.equals("SunOS")) {
        return createProvider("sun.nio.ch.DevPollSelectorProvider");
    }
    if (str.equals("Linux")) {
        return createProvider("sun.nio.ch.EPollSelectorProvider");
    }
    return new PollSelectorProvider();
}
3.Netty提供的Epoll封装
netty依然基于epoll做了一层封装,主要做了以下事情:
(1)java的nio默认使用水平触发,Netty的Epoll默认使用边缘触发,且可配置
- 边缘触发:当状态变化时才会发生io事件。
- 水平触发:只要满足条件,就触发一个事件(只要有数据没有被获取,内核就不断通知你)
(2)Netty的Epoll提供更多的nio的可配参数。
(3)调用c代码,更少gc,更少synchronized
具体可以参考源码NioEventLoop.run和EpollEventLoop.run进行对比
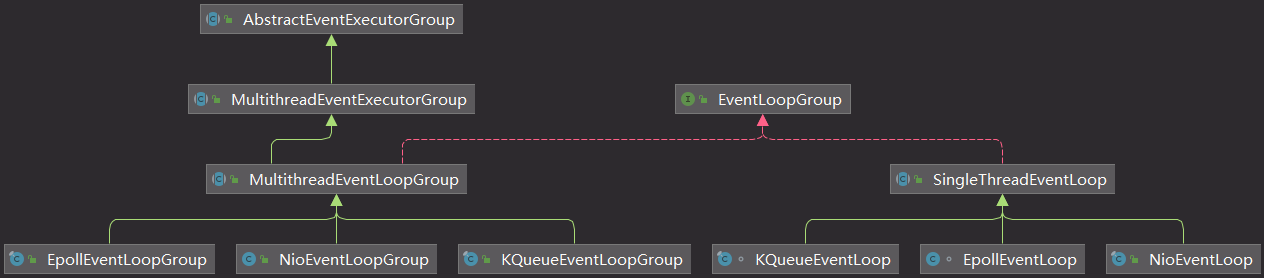
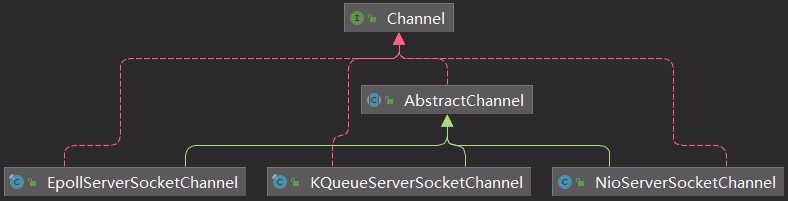
4.Netty相关类图
- 线程组类图
- channel类图
5.配置Netty为EpollEventLoop
// 创建指定的EventLoopGroup
bossGroup = new EpollEventLoopGroup(1, new DefaultThreadFactory("BOSS_LOOP"));
workerGroup = new EpollEventLoopGroup(32, new DefaultThreadFactory("IO_LOOP"));
b.group(bossGroup, workerGroup)
        // 指定channel的class
        .channel(EpollServerSocketChannel.class)
        .childHandler(initializer);
// 其中channel(clz)方法是通过class来new一个反射ServerSocketChannel创建工厂类
public B channel(Class<? extends C> channelClass) {
    if (channelClass == null) {
        throw new NullPointerException("channelClass");
    }
    return channelFactory(new ReflectiveChannelFactory<C>(channelClass));
}
final ChannelFuture initAndRegister() {
    // ...
    Channel channel = channelFactory.newChannel();
    // ...
}
三、Netty相关参数
1. SO_KEEPALIVE
childOption(ChannelOption.SO_KEEPALIVE, true)
TCP链路探活
2. SO_REUSEADDR
option(ChannelOption.SO_REUSEADDR, true)
重用处于TIME_WAIT但是未完全关闭的socket地址,让端口释放后可立即被重用。默认关闭,需要手动开启
3. TCP_NODELAY
childOption(ChannelOption.TCP_NODELAY, true)
IP报文格式
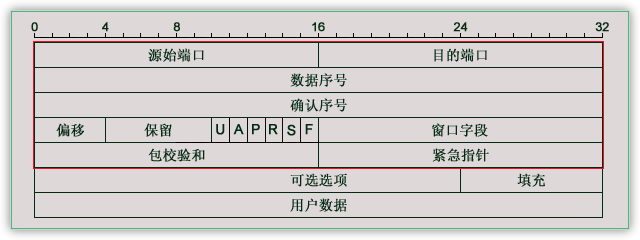
TCP报文格式
- 开启则禁用TCP Negal算法,优点低延时,缺点在大量小数据包的情况下,网络利用率低
- 关闭则开启TCP Negal算法,优点提高网络利用率(数据缓存到一定量才发送),缺点延时高
- Negal算法
- 如果包长度达到MSS(maximum segment size最大分段长度),则允许发送;
- 如果该包含有FIN,则允许发送;
- 设置了TCP_NODELAY选项,则允许发送;
- 未设置TCP_CORK选项(是否阻塞不完整报文)时,若所有发出去的小数据包(包长度小于MSS)均被确认,则允许发送;
- 上述条件都未满足,但发生了超时(一般为200ms),则立即发送。
- MSS计算规则
MSS的值是在TCP三次握手建立连接的过程中,经通信双方协商确定的
802.3标准里,规定了一个以太帧的数据部分(Payload)的最大长度是1500个字节(MTU)
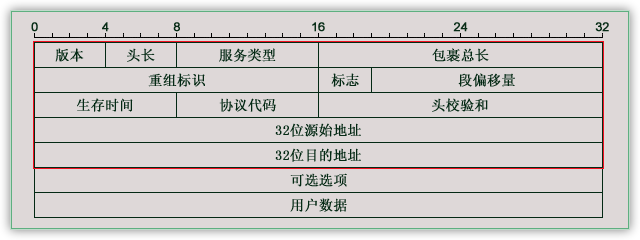
MSS = MTU - IP首部 - TCP首部

以太网环境下:
  MTU = 1500字节
IP首部 = 32*5 = 160bit/8 = 20字节
TCP首部 = 32*5 = 160bit/8 = 20字节

最终得出MSS = 1460字节
结论:因为游戏服务器的实时性要求,在网络带宽足够的情况下,建议开启TCP_NODELAY,关闭Negal算法,带宽可以浪费,响应必须及时
注意:需要客户端服务器均关闭Negal算法,否则仍然会有延迟发送,影响传输速度
4. SO_BACKLOG
option(ChannelOption.SO_BACKLOG, 100)
TCP的三次握手过程如下:

操作系统内核中维护的两个队列
- syns queue:保存syn到达,但没完成三次握手的半连接
cat /proc/sys/net/ipv4/tcp_max_syn_backlog
- accpet queue:保存完成三次握手,内核等待accept调用的连接
注意要修改accept queue的长度需要同时修改系统参数和netty的参数,内核层会取其最小值生效
cat /proc/sys/net/core/somaxconn
netty对于backlog的默认值设置在NetUtil类253行
 SOMAXCONN = AccessController.doPrivileged(new PrivilegedAction<Integer>() {
    @Override
    public Integer run() {
        // 1.设置默认值
        int somaxconn = PlatformDependent.isWindows() ? 200 : 128;

        File file = new File("/proc/sys/net/core/somaxconn");
        if (file.exists()) {
            // 2.文件存在,读取操作系统配置
            in = new BufferedReader(new FileReader(file));
            somaxconn = Integer.parseInt(in.readLine());
        } else {
            // 3.文件不存在,从各个参数中读取
            if (SystemPropertyUtil.getBoolean("io.netty.net.somaxconn.trySysctl", false)) {
                tmp = sysctlGetInt("kern.ipc.somaxconn");
                if (tmp == null) {
                    tmp = sysctlGetInt("kern.ipc.soacceptqueue");
                    if (tmp != null) {
                        somaxconn = tmp;
                    }
                } else {
                    somaxconn = tmp;
                }
            }
        }
    }
}
结论:在应用层,backlog越高,并发连接数的能力越大,但具体数值需根据实际情况确定,队列越长,服务器性能压力也会更高,同时内存占用也会更多
5. ALLOCATOR和RCVBUF_ALLOCATOR
默认分配ByteBuffAllocator赋值如下:
ByteBufUtil.java
static {
    //以io.netty.allocator.type为准,没有的话,安卓平台用非池化实现,其他用池化实现
    String allocType = SystemPropertyUtil.get(
            "io.netty.allocator.type", PlatformDependent.isAndroid() ? "unpooled" : "pooled");
    allocType = allocType.toLowerCase(Locale.US).trim();

    ByteBufAllocator alloc;
    if ("unpooled".equals(allocType)) {
        alloc = UnpooledByteBufAllocator.DEFAULT;
        logger.debug("-Dio.netty.allocator.type: {}", allocType);
    } else if ("pooled".equals(allocType)) {
        alloc = PooledByteBufAllocator.DEFAULT;
        logger.debug("-Dio.netty.allocator.type: {}", allocType);
    } else {
        //io.netty.allocator.type设置的不是"unpooled"或者"pooled",就用池化实现。
        alloc = PooledByteBufAllocator.DEFAULT;
        logger.debug("-Dio.netty.allocator.type: pooled (unknown: {})", allocType);
    }
    DEFAULT_ALLOCATOR = alloc;
}
RCVBUF_ALLOCATOR默认AdaptiveRecvByteBufAllocator
public class DefaultChannelConfig implements ChannelConfig {

    // ...

    public DefaultChannelConfig(Channel channel) {
        this(channel, new AdaptiveRecvByteBufAllocator());
    }
    // ...
}
四、Netty关闭
/**
 * Shortcut method for {@link #shutdownGracefully(long, long, TimeUnit)} with sensible default values.
 *
 * @return the {@link #terminationFuture()}
 */
Future<?> shutdownGracefully();

/**
 * Signals this executor that the caller wants the executor to be shut down.  Once this method is called,
 * {@link #isShuttingDown()} starts to return {@code true}, and the executor prepares to shut itself down.
 * Unlike {@link #shutdown()}, graceful shutdown ensures that no tasks are submitted for <i>'the quiet period'</i>
 * (usually a couple seconds) before it shuts itself down.  If a task is submitted during the quiet period,
 * it is guaranteed to be accepted and the quiet period will start over.
 *
 * @param quietPeriod the quiet period as described in the documentation
                     静默期:在此期间,仍然可以提交任务
 * @param timeout     the maximum amount of time to wait until the executor is {@linkplain #shutdown()}
 *                    regardless if a task was submitted during the quiet period
                     超时时间:等待所有任务执行完的最大时间
 * @param unit        the unit of {@code quietPeriod} and {@code timeout}
 *
 * @return the {@link #terminationFuture()}
 */
Future<?> shutdownGracefully(long quietPeriod, long timeout, TimeUnit unit);

// 抽象类中的实现
static final long DEFAULT_SHUTDOWN_QUIET_PERIOD = 2;
static final long DEFAULT_SHUTDOWN_TIMEOUT = 15;
@Override
public Future<?> shutdownGracefully() {
    return shutdownGracefully(DEFAULT_SHUTDOWN_QUIET_PERIOD, DEFAULT_SHUTDOWN_TIMEOUT, TimeUnit.SECONDS);
}
- 把NIO线程的状态位设置成ST_SHUTTING_DOWN状态,不再处理新的消息(不允许再对外发送消息);
- 退出前的预处理操作:把发送队列中尚未发送或者正在发送的消息发送完、把已经到期或者在退出超时之前到期的定时任务执行完成、把用户注册到NIO线程的退出Hook任务执行完成;
- 资源的释放操作:所有Channel的释放、多路复用器的去注册和关闭、所有队列和定时任务的清空取消,最后是NIO线程的退出。
五、Netty的零拷贝
1. 什么是零拷贝
传统IO读写流程
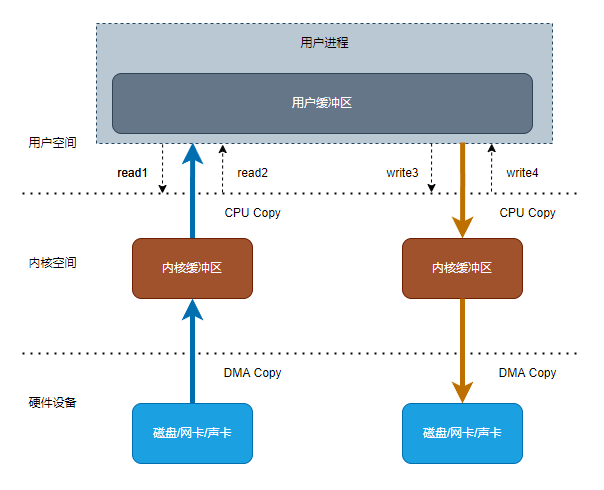
传统读IO流程:
- 用户进程调用read,进行****上下文切换
- 硬件设备使用DMA(Direct Memory Access)复制,把数据拷贝到内核空间缓冲区
- 内核空间使用CPU复制,把数据拷贝到用户空间缓冲区 ,交由用户空间访问使用
- read返回,进行上下文切换
传统写IO流程:
- 用户进程调用write,进行上下文切换
- 内核空间使用CPU复制,把数据拷贝到内核空间缓冲区
- 硬件设备使用DMA(Direct Memory Access)复制,把数据拷贝到硬件设备
- write返回,进行上下文切换
以上流程共产生4次上下文切换,2次DMA拷贝和2次CPU拷贝
2. 为什么要零拷贝
传统IO读写流程,总共发生4次上下文切换,和4次数据拷贝
这个流程中存在多余的上下文切换和数据拷贝,零拷贝的目的则是减少其中的上下文切换和数据拷贝次数(不可能完全消除,所谓零拷贝,仅仅是消除其中的内核空间到用户空间之间的CPU拷贝)
3. 常见的零拷贝实现
1. mmap + write
mmap将内核空间和用户空间的缓冲区进行映射,实现用户空间和内核空间的内存共享,从而减少内核空间到用户空间的一次CPU拷贝
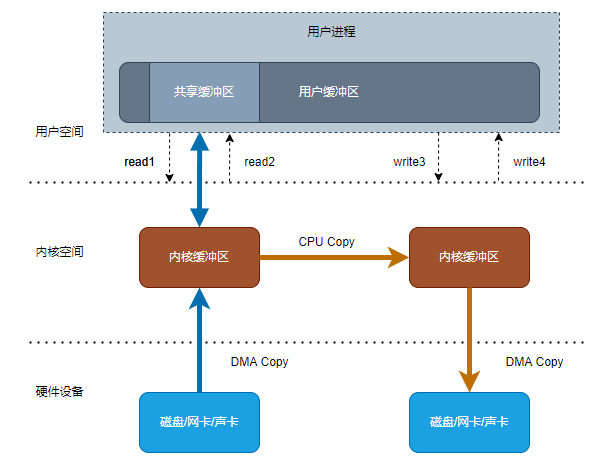
读IO流程:
- 用户进程调用read,进行****上下文切换
- 硬件设备使用DMA(Direct Memory Access)复制,把数据拷贝到内核空间缓冲区
- read返回,进行上下文切换
- 用户空间与内核空间共同访问数据(虚拟内存中的共享缓冲区)
写IO流程:
- 用户进程调用write,进行上下文切换
- 内核空间使用CPU复制,把数据拷贝到内核空间缓冲区
- 硬件设备使用DMA(Direct Memory Access)复制,把数据拷贝到硬件设备
- write返回,进行上下文切换
以上流程共产生4次上下文切换,2次DMA拷贝和1次CPU拷贝
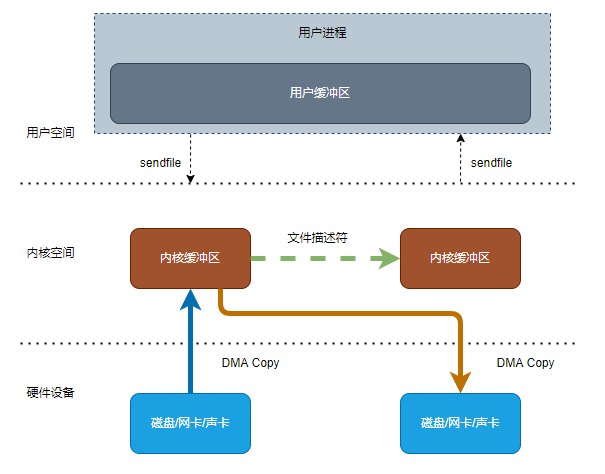
2. sendfile
通过sendfile的系统调用,可以减少其中两次上下文切换,并减少一次CPU拷贝,但缺点是所有操作都在硬件设备和内核空间中完成,用户空间只能发起这个操作,但不能修改其中的数据
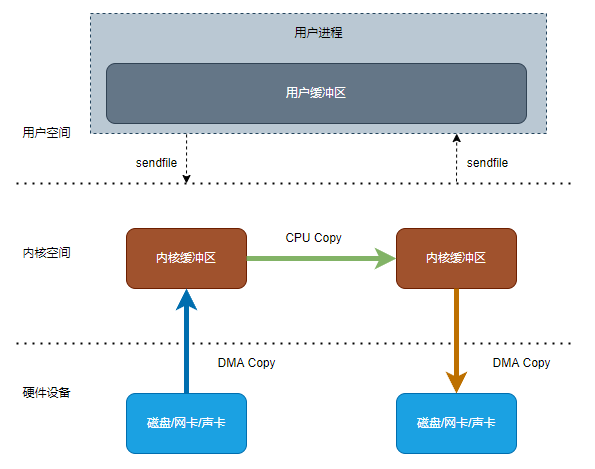
IO流程:
- 用户进程调用sendfile
- 硬件设备使用DMA(Direct Memory Access)复制,把数据拷贝到内核空间缓冲区
- 内核空间使用CPU复制,把数据拷贝到内核空间缓冲区
- 硬件设备使用DMA(Direct Memory Access)复制,把数据拷贝到硬件设备
- sendfile返回,进行上下文切换
以上流程共产生2次上下文切换,2次DMA拷贝和1次CPU拷贝
3. sendfile + dma
Linux2.4引入此方法,此方法在sendfile的基础上,将内核空间的读缓冲区中对应的数据描述信息(内存地址、地址偏移量)记录到相应的写缓冲区中,由DMA根据内存地址、地址偏移量将数据批量地从读缓冲区拷贝到硬件设备中,这样就省去了内核空间中仅剩的 1 次 CPU 拷贝操作
IO流程:
- 用户进程调用sendfile
- 硬件设备使用DMA(Direct Memory Access)复制,把数据拷贝到内核空间缓冲区 ,并将数据描述信息(内存地址、地址偏移量)记录到相应的写缓冲区
- 硬件设备使用DMA(Direct Memory Access)复制,根据数据描述信息(内存地址、地址偏移量)把数据拷贝到硬件设备
- sendfile返回,进行上下文切换
以上流程共产生2次上下文切换,2次DMA拷贝和0次CPU拷贝
4. splice
Linux2.6.17版本引入,在内核空间的读缓冲区和写缓冲区之间建立管道,从而避免了两者之间的 CPU 拷贝操作,2 次上下文切换,0 次CPU 拷贝以及 2次 DMA 拷贝。缺点是两个文件描述符中必有一个是管道设备
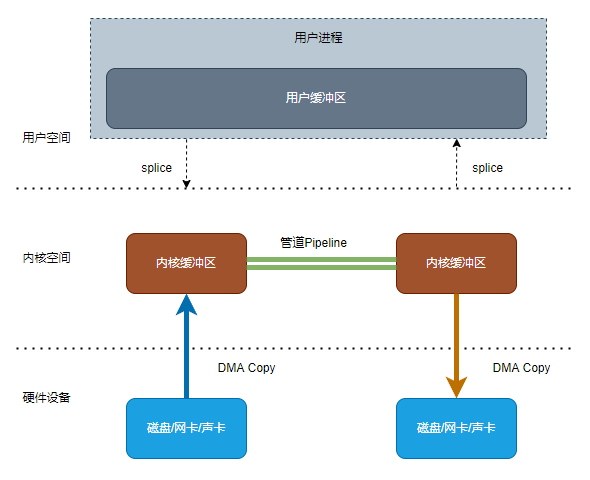
IO流程:
- 用户进程调用splice
- 硬件设备使用DMA(Direct Memory Access)复制,把数据拷贝到内核空间缓冲区 ,并与写缓冲区建立管道
- 件设备使用DMA(Direct Memory Access)复制,通过管道把数据拷贝到硬件设备
- splice返回,进行上下文切换
以上流程共产生2次上下文切换,2次DMA拷贝和0次CPU拷贝
4. Java中的零拷贝实现
jdk原生提供了两种零拷贝的实现方式,分别是mmap和sendfile的实现
- MappedByteBuffer:基于内存映射(mmap)这种零拷贝方式的提供的一种实现。
JDK本身提供一种基于mmap的实现MappedByteBuffer,它可以通过FileChannel的map方法创建一份内核态的数据拷贝对象,使用方式举例:
        Path path = Paths.get("D://test.txt");
        // 修改文件内容
        String writeContent = "aaa";
        // 换byte数组
        byte[] writeBytes = writeContent.getBytes(StandardCharsets.UTF_8);
        try {
            // 打开文件通道
            FileChannel fileChannel = FileChannel.open(path, StandardOpenOption.READ, StandardOpenOption.WRITE, StandardOpenOption.TRUNCATE_EXISTING);
            MappedByteBuffer mappedByteBuffer = fileChannel.map(FileChannel.MapMode.READ_WRITE, 0, writeBytes.length);
            // 修改文件
            mappedByteBuffer.put(writeBytes);
            // 刷新修改到地址所指向的数据
            mappedByteBuffer.force();
        } catch (IOException e) {
            throw new RuntimeException(e);
        }
其中FileChannel的open方法最终是调用到native方法,把数据从硬件设备拷贝到内核空间,并返回文件描述符fd
而FileChannel的map方法则是,先使用Unsafe的allocateMemory在内核中开辟一段内存空间,然后通过FileDispatcher的native方法duplicateHandle,在内核空间中执行CPU数据拷贝。最后再由MappedByteBuffer的force0方法进行DMA数据拷贝
其中关键的native方法如下:
// Unsafe.java:分配内核空间内存
public native long allocateMemory(long var1);
// FileDispatcherImpl.java:内核空间内部的CPU数据拷贝
static native long duplicateHandle(long var0) throws IOException;
// Unsafe.java:对内核数据进行写操作(各种put方法)
public native void putByte(long var1, byte var3);
// MappedByteBuffer.java:内核空间内进行DMA数据拷贝,把内核缓冲区的数据刷到硬件设备
private native void force0(FileDescriptor fd, long address, long length);
- FileChannel:基于sendfile实现
FileChannel也有直接基于sendfile的实现方式,通过其中的transferFrom和transferTo实现
try {
    // 源文件数据读取:硬件设备 -> 内核空间
    FileChannel fromChannel = new RandomAccessFile(new File("F://test1.txt"), "rw").getChannel();
    // 目标文件数据创建:内核空间
    FileChannel toChannel = new RandomAccessFile(new File("F://test2.txt"), "rw").getChannel();
    long position = 0;
    long offset = fromChannel.size();
    // 写数据:内核空间CPU数据拷贝
    fromChannel.transferTo(position, offset, toChannel);
    // 刷新缓存:DMA数据拷贝(内核空间->硬盘设备)
    toChannel.force(true);
} catch (IOException e) {
    throw new RuntimeException(e);
}
其中的内核空间中的CPU数据复制和内核空间到硬盘设备的DMA数据复制中的关键native方法如下:
// FileChannelImpl.java:内核空间中的数据复制
private native long transferTo0(FileDescriptor var1, long var2, long var4, FileDescriptor var6);
// FileDispatcherImpl.java:内核空间内进行DMA数据拷贝,把内核缓冲区的数据刷到硬件设备
private native void force0(FileDescriptor var0, boolean var1) throws IOException;
5. Netty中的零拷贝实现
注意:
- 合理配置JVM启动参数中的MaxDirectMemorySize,能有效控制Linux的内存使用,若堆外内存使用不当,或发生堆外内存泄漏,则可能造成系统级别的OOM
- 使用ByteBuf时,需要注意对象的release释放,否则容易造成内存泄漏(读Channel的ByteBuf对象需要在读完之后release,发数据使用ByteBuf无需release,netty会在最后一层release掉)
不同于jdk原生的实现,netty则提供了自己的三种零拷贝的实现方式
1. Netty对接收和发送的ByteBuffer使用堆外直接内存进行Socket读写
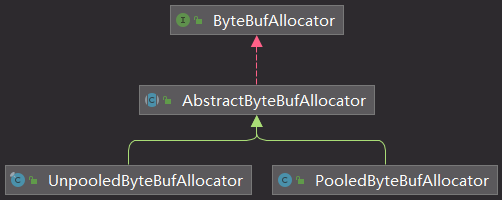
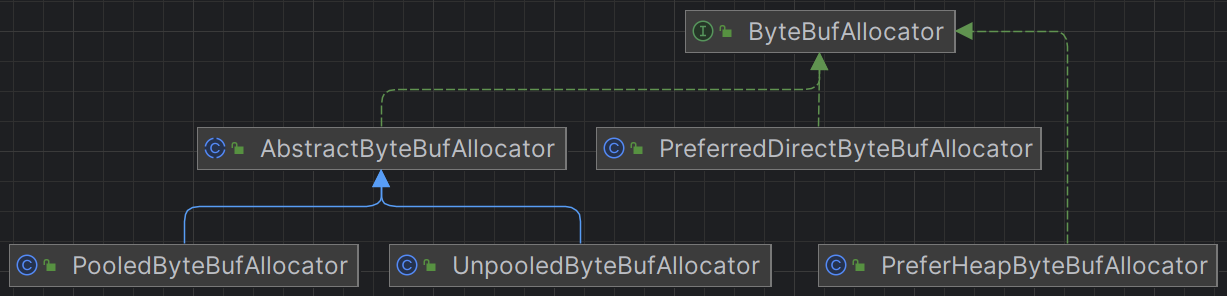
Netty通过ByteBufAllocator进行ByteBuff对象的分配,Netty提供以下几种ByteBufAllocator:
可以通过设置childOption指定Allocator
bootstrap.childOption(ChannelOption.ALLOCATOR, PooledByteBufAllocator.DEFAULT);
bootstrap.childOption(ChannelOption.RCVBUF_ALLOCATOR, AdaptiveRecvByteBufAllocator.DEFAULT);
也可以通过配置VM启动参数指定Allocator
        //以io.netty.allocator.type为准,没有的话,安卓平台用非池化实现,其他用池化实现
        String allocType = SystemPropertyUtil.get(
                "io.netty.allocator.type", PlatformDependent.isAndroid() ? "unpooled" : "pooled");
        allocType = allocType.toLowerCase(Locale.US).trim();

        ByteBufAllocator alloc;
        if ("unpooled".equals(allocType)) {
            alloc = UnpooledByteBufAllocator.DEFAULT;
            logger.debug("-Dio.netty.allocator.type: {}", allocType);
        } else if ("pooled".equals(allocType)) {
            alloc = PooledByteBufAllocator.DEFAULT;
            logger.debug("-Dio.netty.allocator.type: {}", allocType);
        } else {
            //io.netty.allocator.type设置的不是"unpooled"或者"pooled",就用池化实现。
            alloc = PooledByteBufAllocator.DEFAULT;
            logger.debug("-Dio.netty.allocator.type: pooled (unknown: {})", allocType);
        }

        DEFAULT_ALLOCATOR = alloc;
一般来说,不进行任何配置,使用默认的池化分配器即可,而池化分配器默认也是优先使用堆外内存的ByteBuff
public static final PooledByteBufAllocator DEFAULT = new PooledByteBufAllocator(PlatformDependent.directBufferPreferred());
当然以上也不是重点,重点是只要你使用默认配置或者手动设置分配器使用堆外内存,就可以很容易的在netty中使用堆外内存进行socket数据的收发,来避免一次用户空间的字节缓冲区到内核空间的Socket缓冲区的拷贝
在Netty中使用堆外ByteBuf的接口如下:
// AbstractByteBufAllocator.java:抽象分配器,提供分配ByteBuf对象接口,其子类PooledByteBufAllocator和UnpooledByteBufAllocator分别提供池化和非池化的实现方法,最终都是走前面提到的Unsafe.java的allocateMemory方法来分配堆外内存
protected abstract ByteBuf newDirectBuffer(int initialCapacity, int maxCapacity);
Netty的池化ByteBufAllocator在Recycler类中通过ThreadLocal中的Stack数据结构存储,池化ByteBufAllocator仅当池子不够用的时候才会申请新的ByteBuf对象
2. CompositeByteBuf包装组合ByteBuf
Netty中提供CompositeByteBuf类,用于将多个ByteBuf合并成逻辑上的ByteBuf,避免了将多个ByteBuf拷贝成一个ByteBuf的过程
3. Netty中的文件传输
Netty的文件传输类DefaultFileRegion使用了FileChannel的transferTo方法,底层使用到sendfile函数来实现了CPU零拷贝
// DefaultFileRegion.java
@Override
public long transferTo(WritableByteChannel target, long position) throws IOException {
    long count = this.count - position;
    if (count < 0 || position < 0) {
        throw new IllegalArgumentException(
                "position out of range: " + position +
                " (expected: 0 - " + (this.count - 1) + ')');
    }
    if (count == 0) {
        return 0L;
    }
    if (refCnt() == 0) {
        throw new IllegalReferenceCountException(0);
    }
    // Call open to make sure fc is initialized. This is a no-oop if we called it before.
    open();
    long written = file.transferTo(this.position + position, count, target);
    if (written > 0) {
        transferred += written;
    } else if (written == 0) {
        // If the amount of written data is 0 we need to check if the requested count is bigger then the
        // actual file itself as it may have been truncated on disk.
        //
        // See https://github.com/netty/netty/issues/8868
        validate(this, position);
    }
    return written;
}
4. ByteBuf的slice方法
ByteBuf支持slice方法可以将ByteBuf分解成多个共享内存区域的ByteBuf,避免了内存拷贝
/**
 * ByteBuf.java
 * Returns a slice of this buffer's readable bytes. Modifying the content
 * of the returned buffer or this buffer affects each other's content
 * while they maintain separate indexes and marks.  This method is
 * identical to {@code buf.slice(buf.readerIndex(), buf.readableBytes())}.
 * This method does not modify {@code readerIndex} or {@code writerIndex} of
 * this buffer.
 * <p>
 * Also be aware that this method will NOT call {@link #retain()} and so the
 * reference count will NOT be increased.
 */
public abstract ByteBuf slice();
六、Netty的中的粘包半包处理
1. 什么是粘包半包
粘包是指多个独立的数据包被粘合在一起发送,接收端无法区分每个数据包的边界。例如,发送端要发送三个数据包 A、B 和 C,但它们被粘合在一起发送了,接收端收到的数据可能是 AB 或 ABC 等,需要额外的处理才能区分出每个数据包。
半包是指一个完整的数据包被拆分成了多个数据包进行发送,接收端只收到了部分数据包,无法还原完整的数据包。例如,发送端要发送一个数据包 D,但它被拆分成了两个数据包 D1 和 D2 进行发送,接收端只收到了 D1 或 D2,无法还原完整的数据包。
2. 粘包半包原因
粘包和半包是因为数据在网络传输过程中被拆分成多个数据块进行传输,但是接收端无法确定每个数据块的大小和边界,从而导致的问题。
具体来说,粘包现象发生是因为发送方将两个或多个数据包连续地发送到网络中,而接收方一次性读取了多个数据包,从而把它们看作一个数据包处理,造成了粘包的现象。
举个例子,假设发送方一个完整报文的大小为52字节,接收方的滑动窗口大小为256字节,由于接收方处理不及时且滑动窗口空闲大小足够大,这52字节的报文就会缓冲在接收方的滑动窗口中,当滑动窗口中缓冲了多个报文,就会发生粘包现象。
同时,如果在 Netty 中接收方将 ByteBuf 设置过大(默认为1024)以及 Nagle 算法都会造成粘包现象。
而半包现象则是指发送方将一个数据包分割成多个数据块进行传输,在接收方接收到部分数据块时就开始处理数据,从而只处理了部分数据信息,无法还原完整的数据包。
举个例子,假设接收方的滑动窗口大小只剩下128字节,而发送方一个完整报文的大小为256字节,这时,接收方的滑动窗口无法容纳发送方的全部报文,发送方只能先发送前128字节,等待 ACK 确认应答后才能发送剩余部分,这就造成了半包现象。
同时,如果在 Netty 中接收方将 ByteBuf 设置过小以及当发送的数据超过 MSS 的大小限制后,系统都会将数据切分发送,这就会造成半包现象。
这些问题通常由底层协议不正确或者网络拥塞等原因引起。为了解决这些问题,可以采用各种方法,如使用固定长度的数据包、在数据包中添加长度头等方式进行控制。
发生粘包与半包现象的本质是TCP 是流式协议,消息无边界
3. Netty中的解决方案
1. 通过ByteToMessageDecoder解包时处理
在Netty提供的字节数组解码message的解码器中,对数据包做了缓存,当子类的decode把ByteBuf读完之后,才会清掉缓存,因此可以将未读完的包缓存下来,留在下一次数据包发过来一同重新读取
Netty中源码如下:
@Override
public void channelRead(ChannelHandlerContext ctx, Object msg) throws Exception {
    if (msg instanceof ByteBuf) {
        CodecOutputList out = CodecOutputList.newInstance();
        try {
            ByteBuf data = (ByteBuf) msg;
            first = cumulation == null;
            if (first) {
                // 缓存数据包
                cumulation = data;
            } else {
                // 把当前数据包和缓存的数据包拼接
                cumulation = cumulator.cumulate(ctx.alloc(), cumulation, data);
            }
            callDecode(ctx, cumulation, out);
        } catch (DecoderException e) {
            throw e;
        } catch (Exception e) {
            throw new DecoderException(e);
        } finally {
            if (cumulation != null && !cumulation.isReadable()) {
                // 数据读完了,则释放,否则先暂存在内存中
                numReads = 0;
                cumulation.release();
                cumulation = null;
            } else if (++ numReads >= discardAfterReads) {
                // We did enough reads already try to discard some bytes so we not risk to see a OOME.
                // See https://github.com/netty/netty/issues/4275
                numReads = 0;
                discardSomeReadBytes();
            }
            int size = out.size();
            firedChannelRead |= out.insertSinceRecycled();
            fireChannelRead(ctx, out, size);
            out.recycle();
        }
    } else {
        ctx.fireChannelRead(msg);
    }
}
在我们的解码过程中,一旦发现消息包的长度异常,则认为是发生了粘包半包现象,可以重置ByteBuf的下标以缓存当前数据包,如以下业务逻辑代码:
ByteBuf buffer = null;
try {
     in.markReaderIndex();
     int bodyLength = in.readInt();
     if (bodyLength > 0 && !in.isReadable(bodyLength)) {
         in.resetReaderIndex();
         return null;
     }
}
2. 添加Netty提供的粘包半包解码器
Netty本身也提供两种TCP半包的解码器
- LineBasedFrameDecoder:基于换行符(\r\n)分割数据包
- DelimiterBasedFrameDecoder:基于特定字符分割数据包
- LengthFieldBasedFrameDecoder:基于数据长度分割数据包
这个解码器需要与编码器LengthFieldPrepender结合使用,一般情况下,与客户端收发的数据前要加4个字节的消息长度的定义,所以编解码都需要考虑这个长度
- FixedLengthFrameDecoder:定长解码器,指定数据包的长度的解码器
Q.E.D.

